

Scrapy Integration

This tutorial uses the famous Python web scraping framework Scrapy.
Step 1: Install the framework
pip install scrapy proxyherdStep 2: Retrieve project credentials
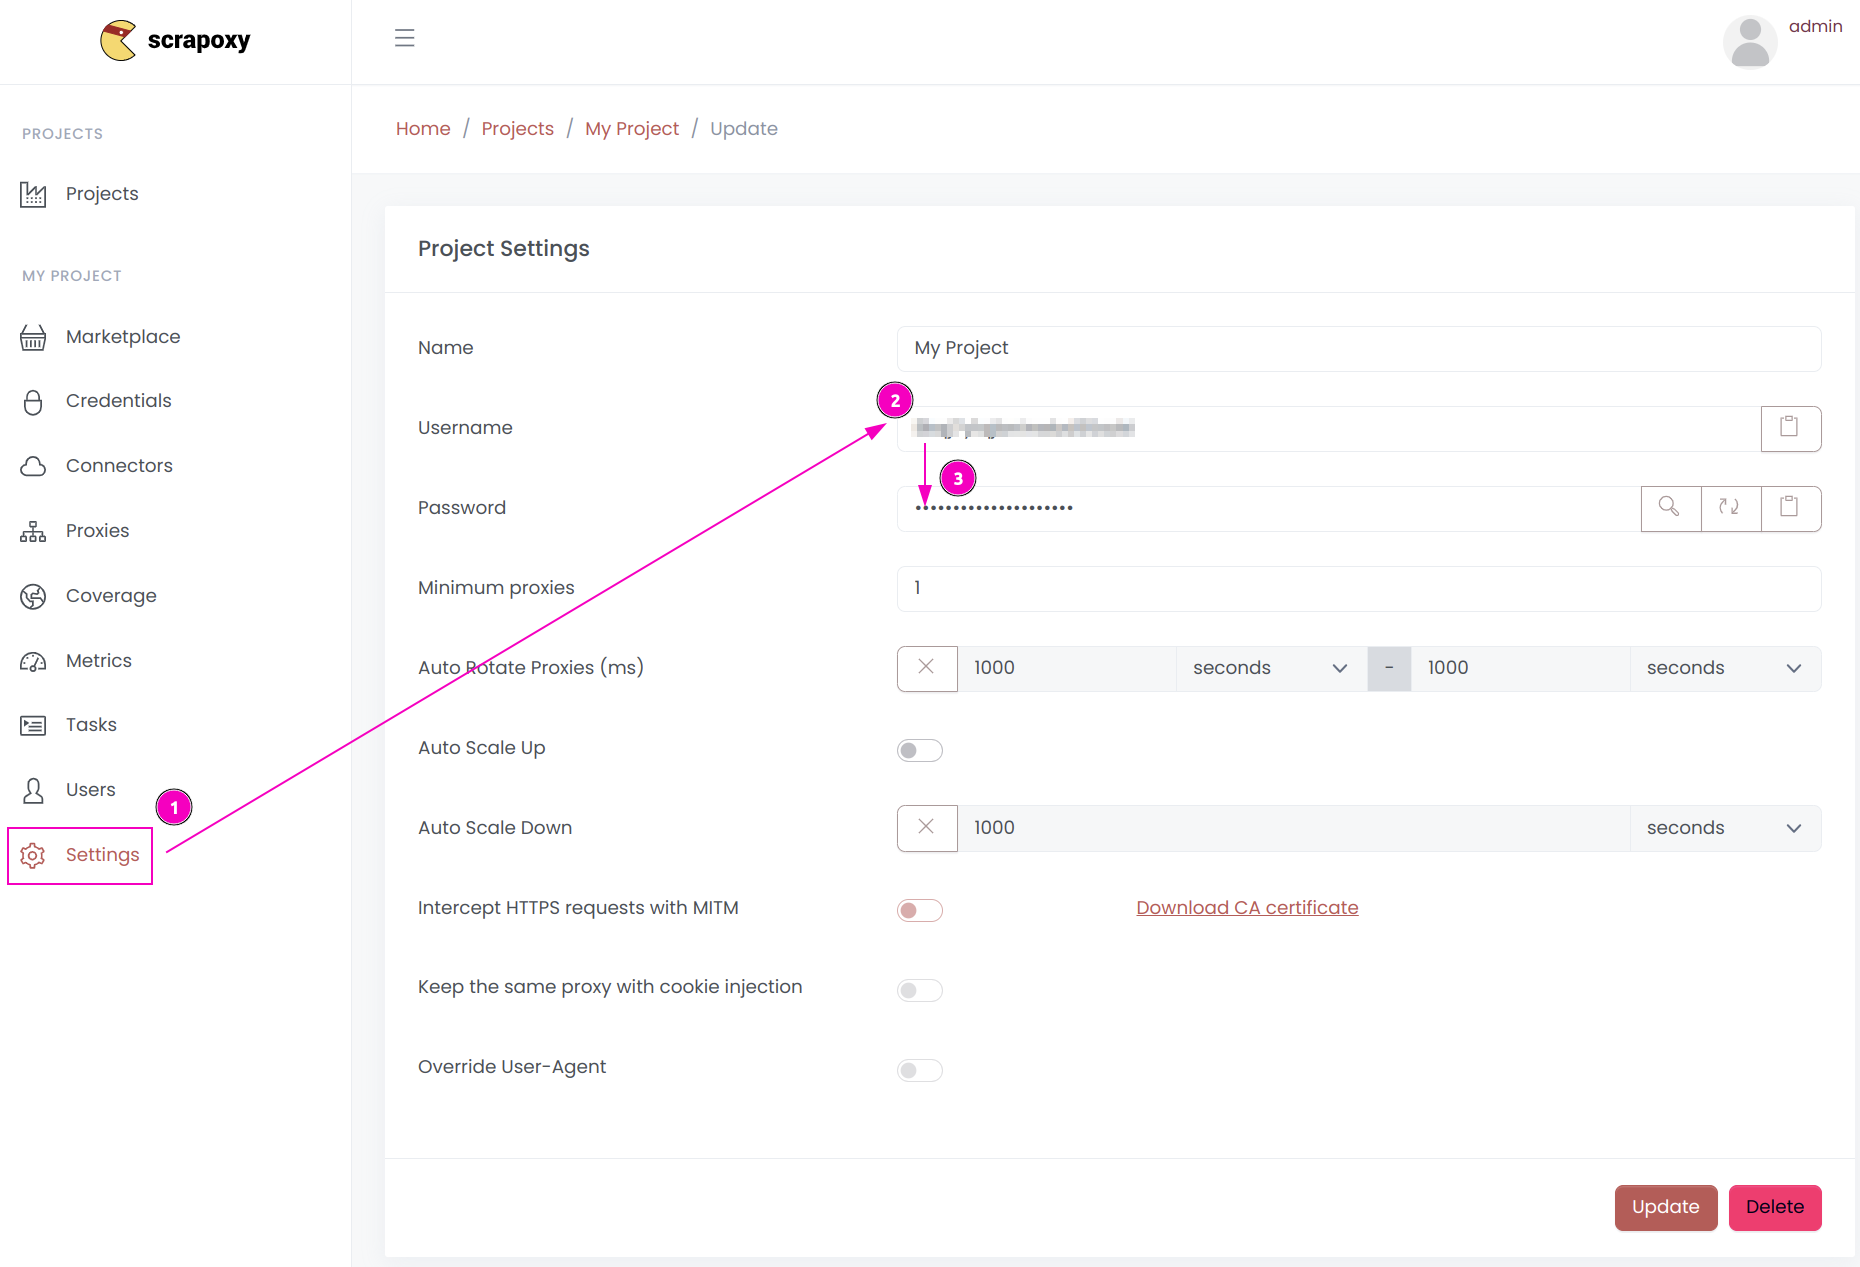
- Open ProxyHerd User interface, and go to the project
Settings; - Remember the project's
Username; - Remember the project's
Password.
Step 3: Create a new project
Create a new Scrapy project:
scrapy startproject myproject
cd myproject
And add a new spider:
scrapy genspider myspider mydomain.comStep 4: Add ProxyHerd usage
Edit myproject/settings.py and modify the following lines:
DOWNLOADER_MIDDLEWARES = {
    'proxyherd.ProxyDownloaderMiddleware': 100,
}

PROXYHERD_MASTER = "http://localhost:8888"
PROXYHERD_API = "http://localhost:8890/api"
PROXYHERD_USERNAME = "USERNAME"
PROXYHERD_PASSWORD = "PASSWORD"
Replace USERNAME and PASSWORD by the credentials you copied earlier.
Step 5: Remove blacklisted instances (optional)
Scrapy uses ProxyHerd's API to kill blacklisted instances.
Edit myproject/settings.py and add the following lines:
DOWNLOADER_MIDDLEWARES = {
    'proxyherd.ProxyDownloaderMiddleware': 100,
    'proxyherd.BlacklistDownloaderMiddleware': 101,
}

PROXYHERD_BLACKLIST_HTTP_STATUS_CODES = [400, 429, 503]
PROXYHERD_BLACKLIST_FORCE = True
PROXYHERD_SLEEP_MIN = 60
PROXYHERD_SLEEP_MAX = 180
This middleware requires enabling MITM in ProxyHerd.
TIP
Add the HTTP status codes you want to blacklist in PROXYHERD_BLACKLIST_HTTP_STATUS_CODES.
Scrapy will pause for a duration ranging between PROXYHERD_SLEEP_MIN and PROXYHERD_SLEEP_MAX seconds when no proxy instance is available.
If PROXYHERD_BLACKLIST_FORCE is set to True, the middleware will automatically enforce instance removal. This feature is only available for certain connector types, indicated by the presence of a Trash icon in the ProxyHerd UI.
Step 6: Auto-scale the scraping session (optional)
Scrapy can start instances at the beginning of a session and terminate them when the session finishes.
Edit myproject/settings.py and add the following lines:
SPIDER_MIDDLEWARES = {
   "proxyherd.ScaleSpiderMiddleware": 100,
}

PROXYHERD_WAIT_FOR_SCALE = 120
Scrapy will wait for a duration of PROXYHERD_WAIT_FOR_SCALE seconds before initiating the scraping session, allowing time for the instances to be ready.
Step 7: Sticky session (optional)
Scrapy can use the same proxy instance for a set of chained requests.
Edit myproject/settings.py and add the following lines:
SPIDER_MIDDLEWARES = {
   "proxyherd.StickySpiderMiddleware": 101,
}
This middleware requires enabling MITM in ProxyHerd.
Step 8: Render page with Splash using Scrapy and ProxyHerd (optional)
Before using Splash, follow the Splash integration guide.
Afterward, install the library:
pip install scrapy-splashThen, add the following lines to settings.py:
SPLASH_URL = "http://localhost:8050"

DOWNLOADER_MIDDLEWARES = {
    "scrapy_splash.SplashCookiesMiddleware": 723,
    "scrapy_splash.SplashMiddleware": 725,
    "scrapy.downloadermiddlewares.httpcompression.HttpCompressionMiddleware": 810,
}
SPIDER_MIDDLEWARES = {
    "scrapy_splash.SplashDeduplicateArgsMiddleware": 100,
}

DUPEFILTER_CLASS = 'scrapy_splash.SplashAwareDupeFilter'
HTTPCACHE_STORAGE = 'scrapy_splash.SplashAwareFSCacheStorage'
Here is an example of spider:
from scrapy import Spider
from scrapy_splash import SplashRequest

class SplashSpider(Spider):
    name = "splash"

    def start_requests(self):
        yield SplashRequest(
            "https://example.com",
            self.parse,
            args={
                "wait": 1,
                "proxy": "http://USERNAME:PASSWORD@HOST_IP:8888",
            }
        )

    def parse(self, response):
        print(response.body)
Replace USERNAME and PASSWORD with the previously copied credentials, and HOST_IP with the IP address of the machine running ProxyHerd.
Step 9: Integrate scrapy-impersonate (optional)
The library scrapy-impersonate is a Scrapy download handler. This project integrates curl_cffi to perform HTTP requests, so it can impersonate browsers' TLS signatures or JA3 fingerprints.
WARNING
Using this library to change the TLS fingerprint disables ProxyHerd's MITM functionality. Also, BlacklistDownloaderMiddleware and StickySpiderMiddleware do not work with scrapy-impersonate.
To use it, first install the package:
pip install scrapy-impersonateAnd add the following lines to settings.py:
TWISTED_REACTOR = "twisted.internet.asyncioreactor.AsyncioSelectorReactor"

DOWNLOAD_HANDLERS = {
    "http": "scrapy_impersonate.ImpersonateDownloadHandler",
    "https": "scrapy_impersonate.ImpersonateDownloadHandler",
}
Here is an example of how to use scrapy-impersonate:
class ExampleSpider(Spider):
    name = "example"
    allowed_domains = ["browserleaks.com"]

    def start_requests(self):
        yield Request(
            url="https://tls.browserleaks.com/json",
            dont_filter=True,
            meta={
                "impersonate": "chrome110",
            },
            callback=self.parse
        )
In this example, the request will emulate a Chrome 110 browser, but you have the flexibility to choose from many other useragents.
INFO
The middleware proxyherd.ProxyDownloaderMiddleware is compatible with scrapy-impersonate. It will set the verify option to False and the proxy authentication.
Also, remember to turn off Intercept HTTPS requests with MITM:
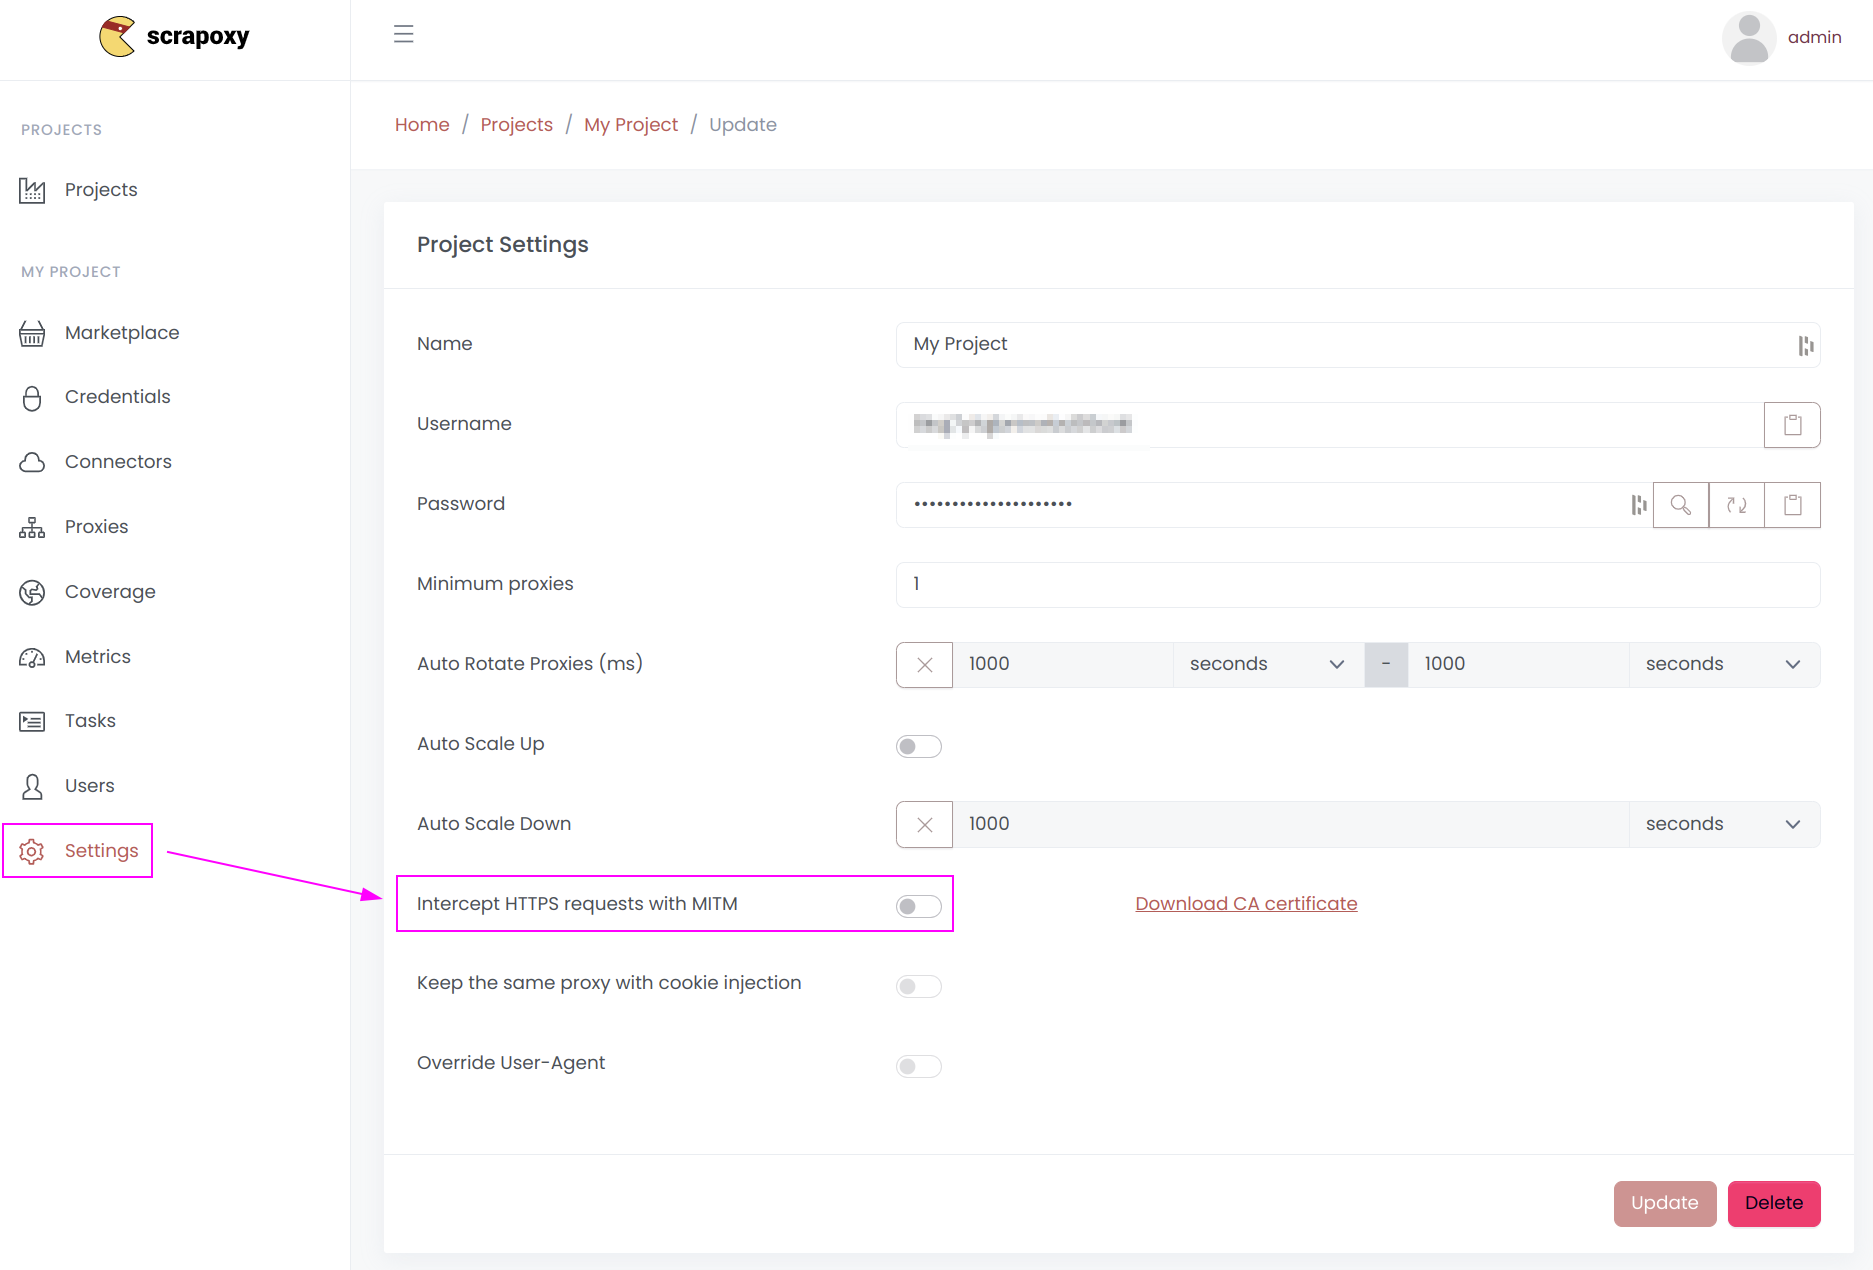
Otherwise, ProxyHerd will use a Node.js TLS fingerprint to connect to the website, bypassing the scrapy-impersonate TLS fingerprint.